
“Who took my stapler? Where’s the multi-channel pipette? I can’t find the autoclave tape! Why are we hoarding empty tip boxes? That bottle’s been there since 2009!”
When a scientist first joins a lab, there will seem to be a bewildering amount of equipment on the benches, cabinets, storage closets, and sometimes even on the floors.
There are three common problems every scientist has come across in their career:
- Ordered materials cannot be found;
- Items are over-ordered or forgotten in the fridge, leading to a waste of space and material; and
- Required resources are out of stock, leading to delays and emergency shipping costs.
Each of these problems can be easily resolved, especially when using a simple inventory management system.
You should continuously monitor product selection details (cost, storage requirements, shelf life, and alternatives) and procurement details (knowing current stock levels and stock consumption, predicting supply, sourcing, timely stock ordering, and assigned inventory owner) of all of your inventory items. You should also keep your eyes on the entire supply chain (unforeseen stock-outs, single suppliers, inadequate logistics, and increased cost of supplies).
Proper inventory management will reduce costs and lead times, improve transparency, allow accurate budgeting, and improve the efficiency of your lab.
Organization
There are two main ways you can organize your inventory:
- Have a preset location for each type of item (ex., all cultures go in location B2-1-Left)
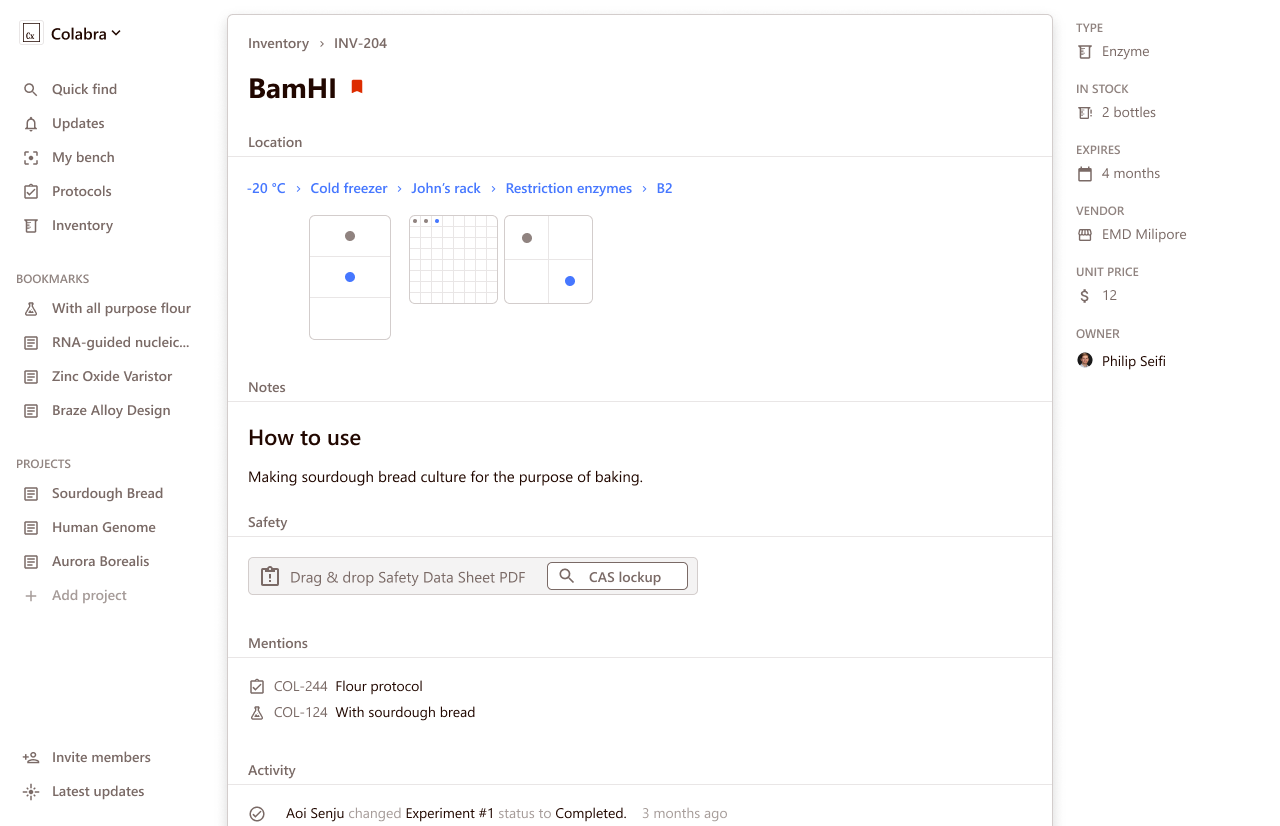
- Store items in any available spot and track their location in a digital record, ideally with the help of QR or barcode scanners.
The first option works well for small inventories with consistent stock levels and a selection of items or labs with limited shelf space.
For larger teams and inventories, particularly if your target stock levels or required items change over time, the second option is, in fact, much more reliable and efficient.
Note: Some level of spatial organization is necessary, even if you go with the second method. For example, you may need to store items at a particular temperature or store hazardous material in locked cabinets.
Here’s an example of digital inventory management system in Colabra:
The first step to getting your inventory in order is to discard all expired material and do a full inventory count to know where you’re at.
📋 Split active and non-active items. Separate your inventory items into two groups: active and non-active. Active products are used regularly and should always be in stock. Non-active items are not routinely ordered and are unlikely to be required in the foreseeable future. For non-active products, either discard them or move them to a location away from your primary storage area. This stock will be rarely accessed, so if you decide to keep it, make sure it’s stored where it won’t get in the way.
📦 Choose an organization system If you’re a small team with relatively constant inventory, divide your inventory into clearly labeled locations based on item types. If you choose the more free-form approach, divide your warehouse into locations based on storage conditions (ex. temperature), safety hazards, and item sizes. Make sure to have enough locations of each type and size to accommodate your expected item levels, with a safety margin in case your requirements change in the future.
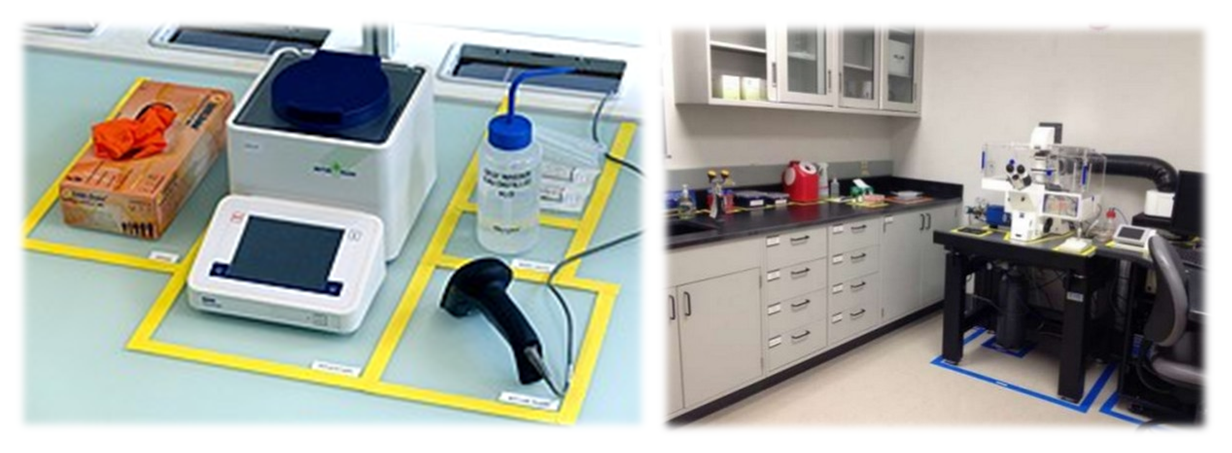
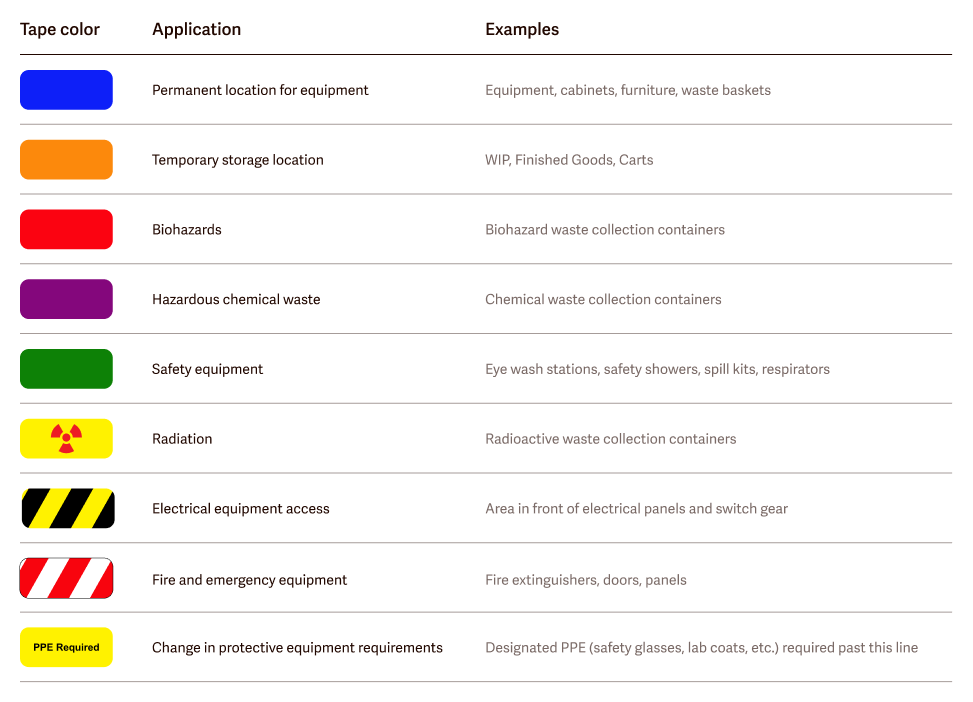
It’s a good idea to identify the location of any equipment, or even lab benches and other furniture, and return them to the same spot after use or cleaning. This prevents mistakes and time wasted looking for the item you need. It also makes onboarding new team members easier (especially with clear color labeling or QR code stickers linking to detailed safety instructions).
Tracking and reordering
The next step to organizing your inventory is setting up accurate stock level tracking and automatically reordering active items.
There are multiple ways to implement a low stock trigger:
Kanban
Toyota invented Kanban to store the minimum amount of inventory while ensuring production lines never get bottlenecked by out-of-stock items.
The low-tech, card-based Kanban workflow is perfect for tracking inventory with constant quantities and locations.
The videos below show Kanban being used by a furniture manufacturer, but the same concepts apply in a lab setting:
🗃️ How to set up Kanban tracking For each item, make a postcard-sized laminated card with the following information: Item code and description Location Minimum quantity Supplier number Supplier name Order quantity Lead time to deliver Next, place each card at the strike point—that is, just after the minimum quantity for the product. For example, if you have a shelf that holds five packs of printer paper, and its minimum quantity is two packs, you’d place the card on top of the second pack. Set up a wall cardholder at the location where inventory orders will be processed. Any time you take items from the inventory and reach a kanban card (ex. after using up the third remaining pack of printer paper), return the card to the cardholder. Finally, assign someone in your lab to go through the cardholder regularly and process the orders. When the supplies arrive, return kanban cards to their minimum quantity locations as you restock the items.
Barcodes, QR codes and RFID
However, in many labs, there can be hundreds of bottles, vials, and tubs of chemicals on hand. For this level of management, a kanban approach might be untenable for searching for each container and tracking the identity of the chemical, the amount present, the associated hazards, where it’s located, and who it belongs to.
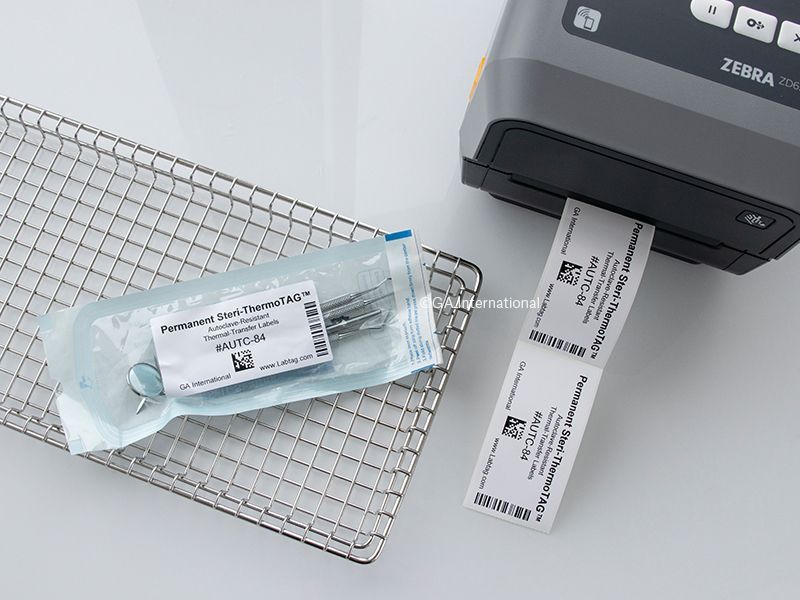
In these cases, it may be better to utilize a system of barcodes, QR codes, or RFID labeling.
In this system, you place stickers or tags on your chemical containers when they enter your facility, and you keep the inventory information stored in a centralized system. This makes it easier to track usage of inventory items across a lab and get a better sense of the remaining supplies.
Google Sheets
Although the low-tech kanban system and QR code system is elegant and effective in the right setting, it can quickly get out of hand if the inventory or quantities required change regularly.
These low-tech systems also do not provide a way to analyze inventory usage and spending, identify bottlenecks, notify expired items, or automatically reorder items without human involvement.
A simple way to digitize your inventory tracking and reap some of these benefits is to create a Google Sheet to track Item types, Receipts, Consumption, and current Inventory.
The videos below explain how to set up a simple inventory management spreadsheet for an e-commerce store, but the same concepts apply in the lab setting:
Continuous improvement
Any inventory and equipment organization system you come up with is bound to be imperfect, and it’s essential to analyze how well it works overtime and make improvements as needed.
For example, make sure to note down anytime an inventory item is out of stock, and if this happens repeatedly, increase the minimum stock quantity that triggers a reorder.
Another exercise that is fun and useful to do with your team is to print out a map of your lab and draw a spaghetti diagram on it, plotting every path you take as you go about your day.
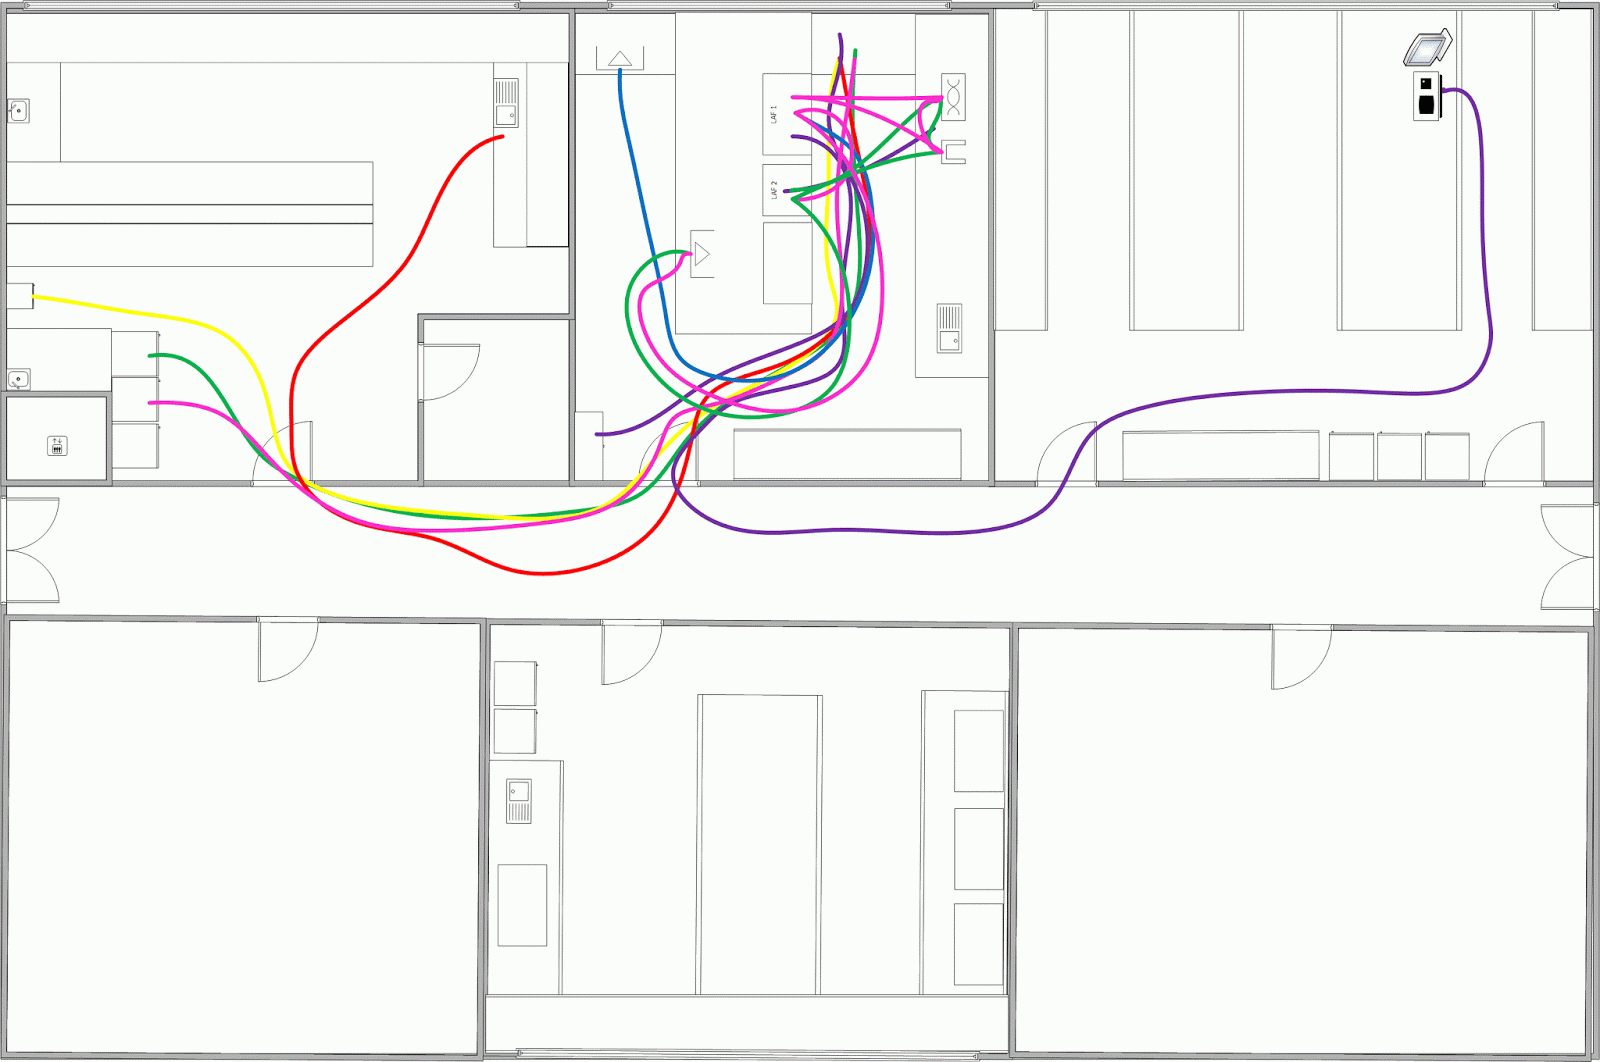
You can then compare your notes at the end of the week and reorganize furniture and equipment to minimize travel time, sample deterioration, and contamination risk.
Safety Data Sheets
One of the keys to lab safety is for everyone to understand the hazards of any chemicals they’ll be working with. The Safety Data Sheet (SDS) is the place to find that information.
A Safety Data Sheet has 16 sections that provide detailed information about the properties of the chemical, its hazards, and how to protect yourself from those hazards. You can usually find the SDS in the box with your supplies or on the manufacturer’s website.
If you have a particularly large team and inventory, you may want to consider using a dedicated SDS management tool such as EcoOnline, but for most labs, an inventory management solution or a simple Google Drive folder with safety PDFs should be enough.
Watch these videos for a quick introduction on how to read an SDS:
Equipment management
Equipment management is broadly similar to inventory management, but with a few key differences in the process that are important to note.
For each piece of equipment in the lab (even the ones you are not using), you should ask:
- What is it, and what does it do?
- Who is in charge of it, and who do you approach if there is a problem?
Before you use any equipment, get a demonstration of its use from a lab member. At the very least, ask if there are particular rules about that equipment. You may have learned how to use the equipment in your old lab, but every lab has slightly different practices.
You should also know where the manual, instruction booklet, or protocol are kept. Most importantly, ensure that you know the lab’s safety practices.
Before you buy any equipment:
- Call colleagues to see whether they have used a particular model and recommend it.
- Ask the manufacturers for the names and phone numbers of people who have purchased the equipment.
- Ask the manufacturer for a demonstration or trial use of the equipment.
- Try to use the same conditions that you will use for your experiments.